
If you've ever dreamed of remodeling an old farmhouse, you've come to the right place. My husband and I had that same dream, and we followed it. This blog will either feed your dream, or make you run (REALLY quickly) for the hills. This is our story.
Tuesday, March 29, 2011
29 days and counting
Just a quick update! We will meet our sweet Walker man on April 28th at 7:30am if he doesn't come sooner! I am SO excited!!!
Sunday, March 27, 2011
Finished Staircase!
Here it is!! My beautiful finished staircase!! My dad did the painting for us! I didn't trust anyone else with white paint that close to all of those steps I stained!! He also lightly sanded the steps and added a little more stain and then put polyurethane on top! This was one of my favorite projects we've done, as it made SUCH a huge difference to the feel of the house! I LOOOOOVE my open staircase and the big, wide hallway. It's just like I dreamed!!


Thursday, March 24, 2011
New Treads
Ready for more staircase work?? After we got the wall taken down and the stairs all nice and open, we could really see what we were working with. I really wanted to keep the original staircase. I loved the idea of walking on the same steps that the original owners walked on. However, many of the steps were cracked and splitting in half. There were a couple that literally felt like you would fall right through, and we didn't want to have to revisit this project 5 years from now if they started to fall apart. We toyed with lots of different ideas, including just replacing the broken stairs, and then sanding and refinishing the others. But, now that they were all open and clearly visible, I wanted them all to match perfectly! In the end, we just purchased all new treads.
Once again, I think my description of this project makes it sound easier than it actually was. Who knew there was so much involved in building a new staircase?!! It's not like you just call up the lumber store and say, "hey I need some treads for my stairs." You need a lot more!! First the structure of the stairs needs to be addressed. After the guys ripped up the old treads, we figured out why the steps felt like you might fall through the middle! There was only a stringer (the zig zag pieces that the treads rest on) up each side, and nothing supporting the middle! We added another stringer up the middle, and these are some sturdy steps now, people!! We needed a new banister now too, since everything was open. Then of course you have to get the spindles and the post for the bottom of the banister. Do you have any idea how many different styles there are?? I probably spent 30 minutes in the store just flipping through the brochures trying to make up my mind!!
Of course all of those things came unfinished, so the next step was some serious staining!! We set them up in my parent's garage so they could air dry and stay away from rain or dirt or anything blowing on them. If you've never worked with stain, it's some sticky stuff!! We did 2 coats of dark walnut stain to match our floors. We thought they would dry in a couple of days, but it ended up being almost a week, and even then they felt a little sticky still!!
Finally a project I could help with!!


This took a while!! We had 17 treads, the new banister, and the big end post for the base of the banister. Two coats on each! It was a loooong night!
Once things were dry, everything was installed. First the treads. Then, all the holes drilled for the balusters (spindles), then the post and banister added. We did not do this ourself!! We hired a trim carpenter who really knew what he was doing!! A wiggly banister is not something to mess around with when you have a toddler! It takes some knowledge to drill the holes straight, but at the correct angle so that each spindle fits and is equally spaced. We went with 3 spindles per step, and they each increased in height. It makes my head hurt even thinking about figuring all those angles and what not. Nope, a professional can deal with that! He came in, and in a matter of 1 day, we had this:

Hallelujah!!! Can you hear the angels singing?!! IT'S GORGEOUS! I loved it even all unpainted like this!!

There was one more step (haha!) to finishing this project! I'll show you in a couple of days!!
Monday, March 21, 2011
Scary Staircase!
Helllllooooo!!! I am still alive if you were wondering! It has been another crazy week of doctor's appointments, grandparent visits, and a girl's weekend. Ben had to go to Dallas for the weekend for work, so me and the girl were on our own for the first time! I haven't spent the night alone since Ben and I got married! We survived, though, and are very happy to have daddy home safe! This week I will be 34 weeks pregnant, which means we are only about 5 weeks away from meeting our little man! It cannot come soon enough! I am now seeing a cardiologist every few weeks for these crazy dizzy spells and light headedness. (that is DEFINITELY not a real word.) I am SO excited it is spring, and I'm starting to have this uncontrollable urge to open all the windows, turn up the radio, and just clean my heart out. However, I don't think that would do much to help my contractions and dizzy spells. I think I am officially entering the "nesting" stage. All of the sudden baby day just seems so close, and there is so much I want to get done before he gets here!! We will see how long I can resist.
I thought I would start showing you the process of opening our staircase. In my opinion, it's one of the best things we did to this house. The original staircase was completely enclosed, and just a little too dark and scary for my liking.

This was quite a project, and one we really didn't know how to tackle. I grew up having a half bath, or as my mom always called it, a "powder room." I really felt like we needed one in this house, because the only 2 bathrooms downstairs are our master and the one in my daughter's room. I wanted a powder room with just a sink and a toilet for guests to use. We knew we would be knocking the staircase wall down, and it turns out there was a lot of wasted space under the steps! It was the perfect place and size for a powder room!
So, since we didn't really know what we were doing, (AGAIN), we just decided that swinging a sledge hammer at some sheetrock would be a good place to start! I will say, once again, I had no part in this. But, the men beat the walls for a while and this is what we got!
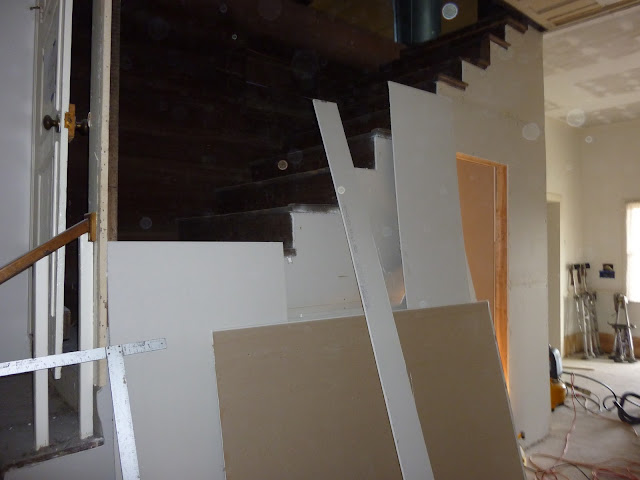
At this point, I was just GIDDY with excitement!! It made SUCH a huge difference! The powder room worked out perfectly and was so easy to add! Dad just cut the doorway out and the sheetrock guys finished it up! They also hung new sheetrock on the wall beside the steps since it was just raw wood planks before. A little more hammering down on the door, and...


Pretty crazy right?? It doesn't even look like the same house! I have to say, not only did it help the staircase in drastic ways, it opened our hallway up several feet as well! If you look, you'll see the wall came out a good 2 feet or so from the staircase. At the end of the hallway, there was a gorgeous glass door. So, when you came in the house through the front door, the foyer was it's own little room with that glass door leading down the hallway. Although I hated to lose the door (we saved it and used it somewhere else!), I really wanted a huge, super wide hallway that started right off the foyer. Here are a couple pictures of the hallway and foyer before we went sledge hammer crazy.
(Sorry about the weird angles!)
This is the foyer before. See how you had to walk through the single doorway to see down the hallway??


Here it is looking from the front door after all the walls came down!! Doesn't it make a huge difference??!

So that's the beginning of the staircase remodel!! The next step was making the stairs safe enough to walk on! :)
P.S. I realize the walls are painted in some of these pictures and completely unfinished in others! That just goes to show you how randomly I took pictures! :)
I thought I would start showing you the process of opening our staircase. In my opinion, it's one of the best things we did to this house. The original staircase was completely enclosed, and just a little too dark and scary for my liking.

This was quite a project, and one we really didn't know how to tackle. I grew up having a half bath, or as my mom always called it, a "powder room." I really felt like we needed one in this house, because the only 2 bathrooms downstairs are our master and the one in my daughter's room. I wanted a powder room with just a sink and a toilet for guests to use. We knew we would be knocking the staircase wall down, and it turns out there was a lot of wasted space under the steps! It was the perfect place and size for a powder room!
So, since we didn't really know what we were doing, (AGAIN), we just decided that swinging a sledge hammer at some sheetrock would be a good place to start! I will say, once again, I had no part in this. But, the men beat the walls for a while and this is what we got!

At this point, I was just GIDDY with excitement!! It made SUCH a huge difference! The powder room worked out perfectly and was so easy to add! Dad just cut the doorway out and the sheetrock guys finished it up! They also hung new sheetrock on the wall beside the steps since it was just raw wood planks before. A little more hammering down on the door, and...


Pretty crazy right?? It doesn't even look like the same house! I have to say, not only did it help the staircase in drastic ways, it opened our hallway up several feet as well! If you look, you'll see the wall came out a good 2 feet or so from the staircase. At the end of the hallway, there was a gorgeous glass door. So, when you came in the house through the front door, the foyer was it's own little room with that glass door leading down the hallway. Although I hated to lose the door (we saved it and used it somewhere else!), I really wanted a huge, super wide hallway that started right off the foyer. Here are a couple pictures of the hallway and foyer before we went sledge hammer crazy.
(Sorry about the weird angles!)
This is the foyer before. See how you had to walk through the single doorway to see down the hallway??

This is after the glass door and doorframe came down, but before the staircase wall came down.

Here it is looking from the front door after all the walls came down!! Doesn't it make a huge difference??!

So that's the beginning of the staircase remodel!! The next step was making the stairs safe enough to walk on! :)
P.S. I realize the walls are painted in some of these pictures and completely unfinished in others! That just goes to show you how randomly I took pictures! :)
Monday, March 14, 2011
Spring has sprung! And a peek at our pantry!
A few months before we moved in, we were very sad to come home one night to find that our sweet kitty, "The Fonz," had been hit by a car and passed away. :( He was a good kitty, and we all miss him! Even though it was late at night, we drove out to the farm house to bury him. The Fonz loved to be outside and loved wide open spaces. He would have loved it out here! We buried him right off our back deck under a pecan tree, and last spring I was sweetly surprised to see that the first flowers to bloom were the Daffodils (or Buttercups if you're from the south!) that marked his "grave." We have had some gorgeous weather here lately, and once again, Fonz's Buttercups have bloomed! :)


We have thoroughly been enjoying the warm Spring weather, playing outside as much as possible! I am so excited for Spring to actually be here and all that comes with it!! (BABY!!!!) I showed you our laundry room last time, and mentioned that we had to find a way to build in a pantry since the original pantry cabinets were lost when the kitchen wall came down. While I love having a big open kitchen, it doesn't leave much wall space. The best idea we could come up with was to build one into the laundry room. It turned out to work just fine! My dad built me some awesome shelves, and it actually holds a ton of food! So since blogger is being extreeeeeeeemely slow today, here are a few pictures of our pantry!

I painted the shelves white and then did 2 coats of chalkboard paint on the front edge of each shelf. I love it! I like a very organized pantry, so it is easy to find something quickly. The little chalk labels work perfectly for me. Please ignore the JUNK on the floor...I won't mention the name of the person who piled it all in there, but see those giant shoes?? NOT mine! :)


Hope you enjoyed the peek at our pantry! I always love seeing how other people organize their pantries. Does that make me weird??
Friday, March 11, 2011
Preggo Update!
How far along? 32 weeks exactly today!
Total weight gain/loss: 11 lbs.
Maternity clothes? Still lovin' them!
Stretch marks? No new ones.
Sleep: Lately I am sleeping well until around 4:00 and then I wake up and can't fall back asleep. I'm very tired!!
Best moment this week: Walker got the hiccups! Lasted for about 30 minutes! Ben could feel them too!
Movement: This kid is crazy! Haha! I swear sometimes he will just stretch out completely. Feels like my tummy will pop!
Cravings: I started making these buffalo chicken wraps at home and I've eaten one everyday for the last 2 weeks! And of course my craving for lunch meat still remains....
Gender: Little man!
Gender: Little man!
Labor Signs: Contractions!! Pretty consistently still. :( They started to get pretty strong last week.
Belly Button in or out? Still in.
What I miss: Red wine.
What I am looking forward to: Dr. appointment on Tuesday. Eager to see how he's doing!
Weekly Wisdom: Listen to your body when it wants you to rest. This is usually easier said than done.
Belly Button in or out? Still in.
What I miss: Red wine.
What I am looking forward to: Dr. appointment on Tuesday. Eager to see how he's doing!
Weekly Wisdom: Listen to your body when it wants you to rest. This is usually easier said than done.
Milestones: It was exciting when I hit 30 weeks! In the 10 week countdown! If we make it to the c-section date, only 49 days left!!! WOOHOO!!!!
Friday, March 4, 2011
Laundry Room Reveal
Howdy! Anyone else glad it's Friday!?? I'm looking forward to having the hubs home to help out with this wild woman I have runnin through my house! I took some pictures of the finished laundry room, although I must say, there is a little bit more trim that needs painted.


I never planned to keep this old fridge inside, but I must say, I LOVE having another fridge for drinks and stuff. Plus, who DOESN'T need more freezer space?? I like to refer to this fridge as the "graffiti fridge." Sums up the outside AND the inside!

This is looking back into the kitchen. Behind the bifold doors is our pantry. I'll show you that in another post. And YES, the doors are still an off white because we are too lazy to paint them and too cheap to replace them. Who wants to paint all those slats?? Not this girl.

I saw these signs on Etsy, but of course was too cheap to buy one. So, I just painted my own!

My FREE shelf that holds all of my cleaning supplies. I use mainly Shaklee cleaners, so I don't have a million different bottles.


Remember I told you I loved the little benches with the baskets? I found this at Home Depot for like $60! It's part of Martha Stewart's line. The baskets house all the pet stuff.

So that's our laundry room! I'm really happy with it, minus the unpainted doors and trim. Why is it that we can knock out a huge project in a few days, but the tiny little things like painting trim will take months to get to??
Here is the view from the kitchen. We originally planned to put a pretty glass door up, so I could shut out the noise of the washer and dryer. But, after it was all said and done, we decided against it. I doubt it would ever be closed anyway, and would most likely end up annoying me and I'd make Ben take it back off. :)

One day we will have nice, built in shelves above the washer and dryer. But for now, we settled for the FREE wire shelf that came from my inlaws! You know how I feel about free stuff!

I never planned to keep this old fridge inside, but I must say, I LOVE having another fridge for drinks and stuff. Plus, who DOESN'T need more freezer space?? I like to refer to this fridge as the "graffiti fridge." Sums up the outside AND the inside!


And ONE day....far, far, far down the road when mine give out, I'll have these babies to match my walls! <3

Remember I told you I loved the little benches with the baskets? I found this at Home Depot for like $60! It's part of Martha Stewart's line. The baskets house all the pet stuff.

Wednesday, March 2, 2011
Laundry Room Dreams
I bet if you ask anyone about the one room in their house that is just never big enough, they will tell you it's their laundry room. If you're like me, you don't JUST do laundry in your laundry room. Most of the time, I take all the clothes in there and throw them all over the floor to sort them. I also keep all of my cleaners up on a shelf in there to keep them far away from little hands. All the brooms, mops, iron and ironing board are in there too. All the pet supplies is also in there. Also, it seems like a lot of our junk ends up in there. Ya know, the stuff there is never a place for.
When we started renovating, I knew I wanted to maximize the laundry room space the best I could. Do you remember our original laundry room?


We finished the tile just a couple of weeks before we moved in, so this is basically how the room looked on move in day. I think I mentioned that we moved in on May 19th, and it was our anniversary. If we had a choice in the matter, we would have liked to have more done in the house before moving our little family of 3 into it! But, we were just so thankful our other house sold and they wanted to close and move in...so that meant we had to be OUT! Here I am in my new laundry room the night we moved in! Do I look a little excited?? :)

When we started renovating, I knew I wanted to maximize the laundry room space the best I could. Do you remember our original laundry room?

The first thing we did was take the bifold doors off and tear down the walls! The guys also knocked out all of those wimpy shelves! And sadly, yes, the pencil sharpener had to go. I wanted bead board on the walls in here. (Shock!) So, the walls had to be fixed and smoothed out. We also had to figure out a way to frame in a pantry, since we took down the kitchen wall that originally held the pantry. I have always dreamed of having a mud room, or at least a small tiled area where we can come in with wet feet or muddy boots. I love those cute little benches with the baskets underneath! We also have an old extra fridge that we kept around during the renovations, and it ended up in the laundry room as well. We had a lot of stuff and a lot of needs for our laundry room. But would we be able to pull it off??
The original laundry room was closed off, and had those bifold doors so you could shut it off. There was a small hallway that ran beside it to the back deck door. We thought it would feel a lot more spacious if we just made it all one big room. I couldn't have a separate mud room, so I settled for a mud room/laundry combo. Our back deck door is in the laundry room, so that is where we come in if we are dirty. Ya know, from all that yard work we've been doing....riiiiiight.
I realized last night that from these blog posts, these projects seem to have happened relatively quickly and easily. Um...not the case folks!! There were so many steps to get to each new step, it's just impossible to explain it all in words! There were tons of projects along the way that I haven't mentioned yet. Like the ceilings. Every single room in the house had popcorn ceilings. We realllly didn't want popcorn, so that meant it all had to be scraped off. Anyone out there ever scraped ceilings?? NOT a fun job. Now, I'll go ahead and say, luckily I am very short and we have tall ceilings....so my services were not needed in this particular project. :) However, Ben and his friends spent probably 3 good weeks (at least) coming up to the house every night AFTER they had worked at their normal jobs every day. They had spray bottles that they used to spray water on the popcorn to soften it, and then climbed up on ladders and used putty knives and scrapers to scrap it all off. Then you have to use sand paper to sand everything super smooth. This creates unimaginable amounts of dust. Then you have to go back and sweep up all the mess and dust. It's an awful job, and they did every room in the house. Makes for sore arms peeps! After it was all cleaned up and dust free, my dad primed and painted every single ceiling for us. Ever stand on a ladder with your arms over your head while looking up at the ceiling painting and trying to stay balanced? Easier said than done! The ceilings are just an example of a project that seems very small and boring, but makes a GINORMOUS difference in the finished look of a room!! I love my smooth ceilings and I'm grateful to the men in my life that spent a month of their lives making it happen! All to appease little ol' me! Here's the laundry room with everything smooth and some of the new trim added.

Then dad got busy on my bead board! We kept it high again so we could see it behind the washer and dryer.


Next on the list was the floor! Dad put down backer board and I picked the tile! Sounds fair right?? I FELL IN LOVE with this tile from Lowes!! It's my favorite floor in the whole house! It has all different shades of blues and grays, and looks awesome coming off of my granite!!

Dad and I worked side by side laying this tile. It was actually fun!! It was a gorgeous spring day, the doors and windows were open, and the radio was blastin! It's days like these that I will remember when I'm old and gray and walk across those tiles. The memories of working with my dad in my dream house will stay with me forever and ever!

This next picture shows the new framing for the pantry. It looks small here, but actually turned out to be pretty huge once the shelves were in! I love it!!


We finished the tile just a couple of weeks before we moved in, so this is basically how the room looked on move in day. I think I mentioned that we moved in on May 19th, and it was our anniversary. If we had a choice in the matter, we would have liked to have more done in the house before moving our little family of 3 into it! But, we were just so thankful our other house sold and they wanted to close and move in...so that meant we had to be OUT! Here I am in my new laundry room the night we moved in! Do I look a little excited?? :)

I'll post the finished laundry room pictures soon! Stay tuned!
Subscribe to:
Posts (Atom)